

In this article, we will see how one can deploy a full-stack app (MERN stack) to a K8s cluster. Here we will use the simple Minikube cluster.
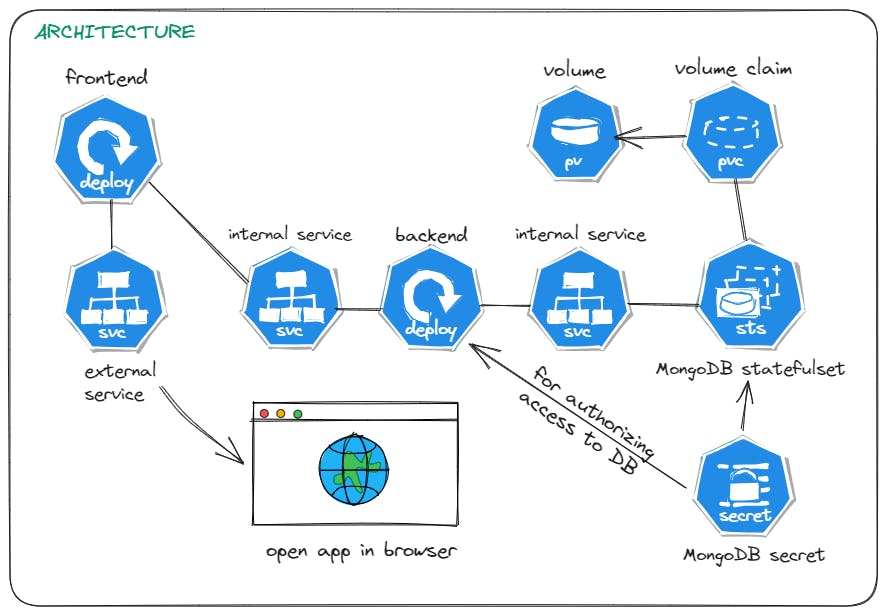
Architecture 👷♂️
The below figure illustrates the whole architecture for our deployment to K8s.
Start Minikube and connect to Lens ☸️
minikube start
The above command will start your minikube cluster. If everything runs properly you can see one node getting displayed on running the command kubectl get nodes.
Now you can connect to this cluster in Lens by adding the cluster kube config file. You can get it by running the command kubectl config view .
Set up MongoDB as a StatefulSet 🫙
Since we want to persist our data we will go ahead and create a stateful set instead of a deployment for our database. We can simply create a secret that will be used for authenticating users for accessing the database.
apiVersion: v1
kind: Secret
metadata:
  name: mongodb-secret
type: Opaque
data:
  username: cm9vdA==
  password: cGFzc3dvcmQ=
By running the command kubectl apply -f mongodb-secret.yml we can create our secret.
Make sure to convert your secrets to base64 values. Like here we have obtained the base64 value for the username by running the command: echo -n "root" | base64
Now you can set up the Mongodb stateful set and its internal service for communication within the cluster.
apiVersion: apps/v1
kind: StatefulSet
metadata:
  name: mongodb-stateful-set
  labels:
    app: mongodb
spec:
  replicas: 2
  selector:
    matchLabels:
      app: mongodb
  template:
    metadata:
      labels:
        app: mongodb
    spec:
      containers:
      - name: mongodb
        image: mongo:latest
        ports:
        - containerPort: 27017
        volumeMounts:
        - name: mongodb-data
          mountPath: /data/db
        env:
        - name: MONGO_INITDB_ROOT_USERNAME
          valueFrom:
            secretKeyRef:
              name: mongodb-secret
              key: username
        - name: MONGO_INITDB_ROOT_PASSWORD
          valueFrom:
            secretKeyRef:
              name: mongodb-secret
              key: password
  volumeClaimTemplates:
  - metadata:
      name: mongodb-data
    spec:
      accessModes: [ "ReadWriteOnce" ]
      resources:
        requests:
          storage: 1Gi
We are creating a PVC that would be bound with the pod replicas. This will automatically create our PVs (Persistent Volumes) for persisting our data. Whenever we restart our cluster the past data will be retrieved.

Next, we create an internal service:
apiVersion: v1
kind: Service
metadata:
  name: mongodb-service
spec:
  selector:
    app: mongodb
  ports:
    - protocol: TCP
      port: 27017
      targetPort: 27017
If everything works properly you will something similar in your lens dashboard

Connect Mongo Express GUI 🔗
To keep track of our database changes we can connect a Mongo Express GUI.
apiVersion: apps/v1
kind: Deployment
metadata:
  name: mongo-express-deployment
  labels:
    app: mongo-express
spec:
  replicas: 1
  selector:
    matchLabels:
      app: mongo-express
  template:
    metadata:
      labels:
        app: mongo-express
    spec:
      containers:
        - name: mongo-express
          image: mongo-express:latest
          ports:
            - containerPort: 8081
          env:
            - name: ME_CONFIG_MONGODB_ADMINUSERNAME
              valueFrom:
                secretKeyRef:
                  name: mongodb-secret
                  key: username
            - name: ME_CONFIG_MONGODB_ADMINPASSWORD
              valueFrom:
                secretKeyRef:
                  name: mongodb-secret
                  key: password
            - name: ME_CONFIG_MONGODB_SERVER
              value: mongodb-service
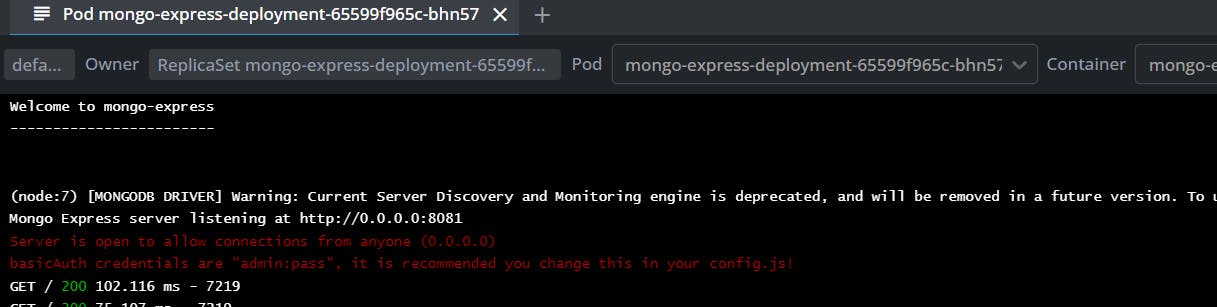
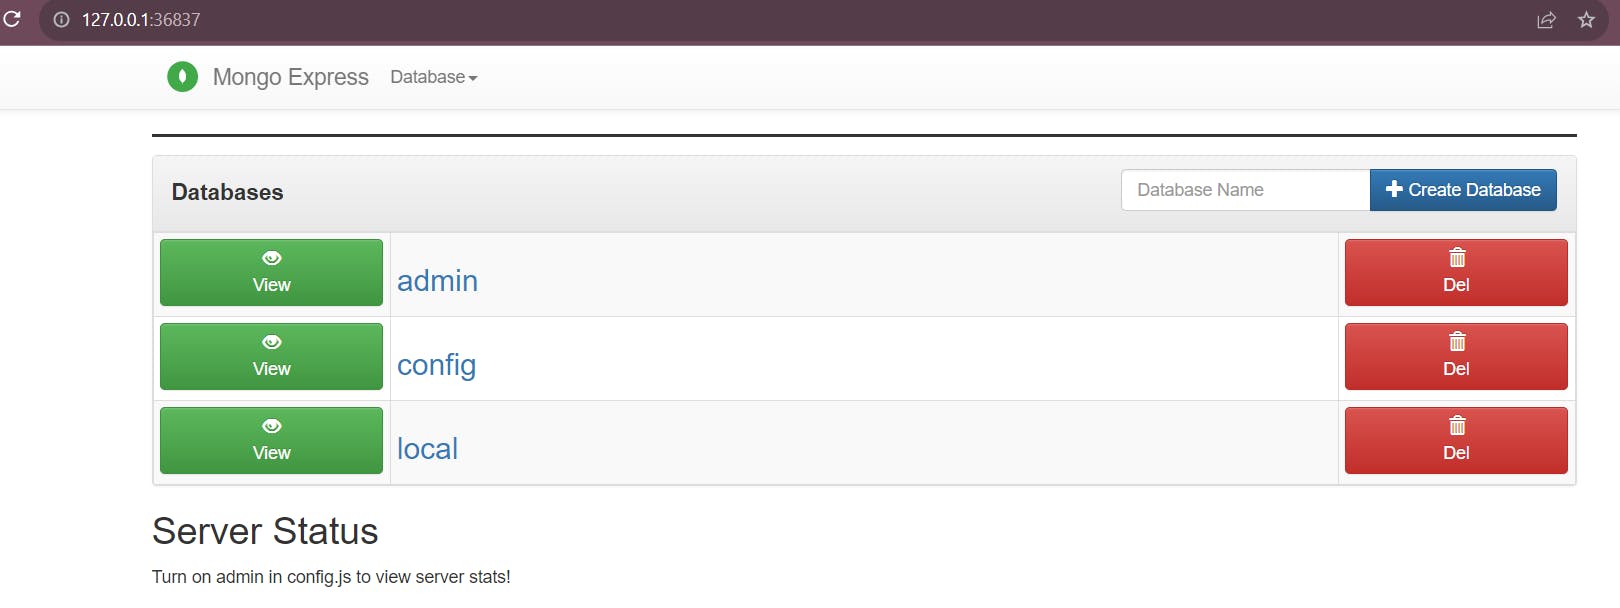
The secret should match to authorise access. On successful connection, we will get something like this:
You can create an external service of type "LoadBalancer" to see the GUI in the browser. This will assign it an external IP.
apiVersion: v1
kind: Service
metadata:
  name: mongo-express-service
spec:
  selector:
    app: mongo-express
  type: LoadBalancer
  ports:
    - protocol: TCP
      port: 8081
      targetPort: 8081
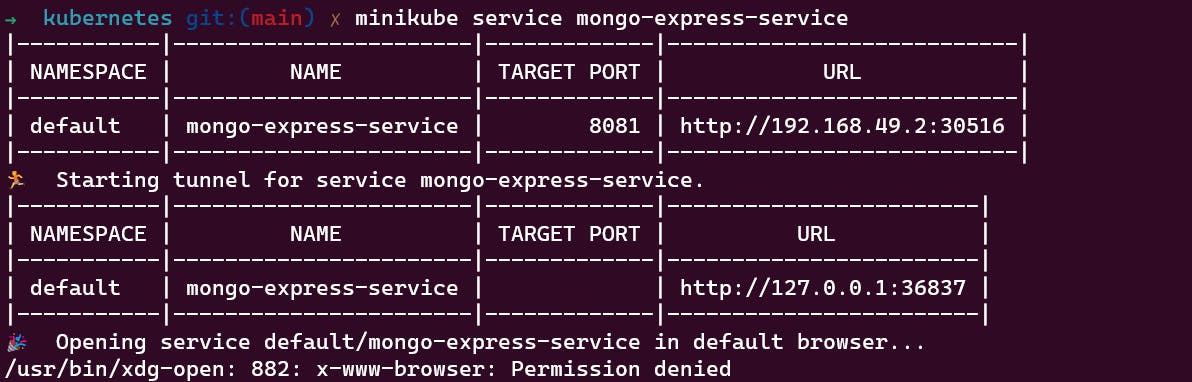
Now you can run the command minikube service mongo-express-service to get the external IP address.
Run the backend server and connect to MongoDB 👀
Now we will create our backend deployment and connect it to our MongoDB database. Using a deployment is better than creating manual pods as it will make sure that we always have 2 instances of the server running in case some failure occurs.
apiVersion: apps/v1
kind: Deployment
metadata:
  name: note-server-deployment
  labels:
    app: note-server
spec:
  replicas: 2
  selector:
    matchLabels:
      app: note-server
  template:
    metadata:
      labels:
        app: note-server
    spec:
      containers:
      - name: note-server
        image: ghcr.io/ananya2001-an/note-server:latest
        ports:
        - containerPort: 5000
        env:
        - name: MONGODB_URI
          value: mongodb://mongodb-service:27017
        - name: DB_NAME
          value: mydb
        - name: DB_USER
          valueFrom:
            secretKeyRef:
              name: mongodb-secret
              key: username
        - name: DB_PASS
          valueFrom:
            secretKeyRef:
              name: mongodb-secret
              key: password
The mongodb-service will map the connection to our database pods. Hence the Mongodb uri is: mongodb://mongodb-service:27017 .
Now we will create the server's internal service:
apiVersion: v1
kind: Service
metadata:
  name: note-server-service
spec:
  selector:
    app: note-server
  ports:
    - protocol: TCP
      port: 5000
      targetPort: 5000
If the server is connected to the database successfully we will get something like this in the server logs. You can see logs using kubectl logs <pod-name>.

Connect frontend web app 🕸️
Now we will run our react frontend app as a deployment and make requests to our backend server from it.
We have set up a nginx web server for our react app which will route the requests to our server with the help of its internal service. It looks something like this:
# Increase request size limit to 100MB
client_max_body_size 100m;

# Define an upstream block for your backend service
upstream Backend {
    server note-server-service.default:5000;
}

server {
  listen 80;

  # needed for react router so that on refresh we dont get 404 error
  location / {
    root   /usr/share/nginx/html;
    index  index.html index.htm;
    try_files $uri $uri/ /index.html;
  }

  error_page   500 502 503 504  /50x.html;

  location = /50x.html {
    root   /usr/share/nginx/html;
  }

  # Use the "Backend" upstream for routing /notes and /assignments requests
  location ~ ^/(notes|assignments) {
      proxy_pass http://Backend;
  }
}
Now we can create our frontend deployment and external service similar to Mongo Express GUI for accessing the app from the browser.
apiVersion: apps/v1
kind: Deployment
metadata:
  name: note-deployment
  labels:
    app: note
spec:
  replicas: 2
  selector:
    matchLabels:
      app: note
  template:
    metadata:
      labels:
        app: note
    spec:
      containers:
      - name: note
        image: ghcr.io/ananya2001-an/note:latest
        ports:
        - containerPort: 80
apiVersion: v1
kind: Service
metadata:
  name: note-service
spec:
  selector:
    app: note
  type: LoadBalancer
  ports:
    - protocol: TCP
      port: 3000
      targetPort: 80
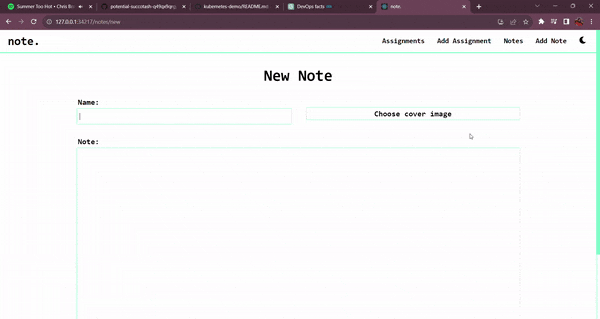
Get the external IP and open it in the browser. You can now do successful CRUD operations from the app's front end.
With this article, you were able to learn how to deploy a MERN stack app to K8s 🎊